
- 1 Introduction
- 1.1 About ZenTao
- 1.2 How to get support
- 2 How to Install ZenTao
- 2.1 Choose the best installation
- 2.2 ZenTao Cloud
- 2.3 One-click Installation Package for Windows (Recommended)
- 2.4 One-click Installation Package for Linux
- 2.5 Source Code Installation Package (for all Systems)
- 2.6 Set up Virtualbox for ZenTao
- 2.7 Softaculous service
- 3 Upgrade ZenTao
- 3.1 Choose Upgrade
- 3.2 Upgrade by source codes (General for all systems)
- 3.3 Upgrade for one-click installation package for windows users (xampp)
- 3.4 Upgrade for one-click installation package for Linux
- 4 Users and Groups
- 5 Simple Application
- 6 Basic Application
- 6.1 Basic Workflow
- 6.2 Agile and Scrum
- 6.3 ZenTao and Scrum
- 6.4 ZenTao Tutorial for Rookies
- 6.5 Create a Product
- 6.6 Create a Story
- 6.7 Create a Project
- 6.8 Confirm Stories
- 6.9 Decompose Tasks
- 6.10 Report a Bug
- 6.11 Manage Contacts
- 6.12 Customization
- 7 Advanced Application
- 7.1 Workflow
- 7.1.1 ZenTao Workflow
- 7.2 Personal management
- 7.2.1 My To-dos
- 7.2.2 My Task, Story and Bug
- 7.2.3 My Profile
- 7.3 Product Manager
- 7.3.1 Manage a Product
- 7.3.2 Create and Review a Story
- 7.3.3 Change and Review a Story
- 7.3.4 Story Status
- 7.3.5 Notes for Writing a Story
- 7.3.6 Product Module
- 7.3.7 Release Plan
- 7.3.8 Create a Release
- 7.3.9 Roadmap
- 7.3.10 Manage Documents
- 7.3.11 Product Meetings
- 7.3.12 Project Management, Presentation and Summary
- 7.3.13 Story Reports
- 7.4 Project Manager
- 7.5 Development Team
- 7.5.1 Project planning meeting and decompose tasks
- 7.5.2 Claim and update Tasks
- 7.5.3 Create a Build
- 7.5.4 Test Task
- 7.5.5 Resolve a Bug
- 7.5.6 Manage Documents
- 7.5.7 Confirm Bugs
- 7.6 Testing Team
- 7.6.1 Bug Management
- 7.6.2 Submit a Bug
- 7.6.3 Confim and Close a Bug
- 7.6.4 Activate a Bug
- 7.6.5 Find a Bug
- 7.6.6 Test Case
- 7.6.7 Create a Test Case
- 7.6.8 Manage a Test Task
- 7.6.9 Execute Cases and Report Bugs
- 7.6.10 Reports
- 8 Configuration
- 8.1 Maintain ZenTao
- 8.1.1 Initialize scripts
- 8.1.2 Back up ZenTao
- 8.1.3 Recover the deleted
- 8.1.4 Update Burndown charts
- 8.2 Deploy ZenTao
- 8.2.1 Guest Login
- 8.2.2 Cnfigure Email
- 8.2.3 Set Super Admin
- 8.2.4 Configure Static Access
- 8.2.5 Delete "zentao" from your address
- 8.2.6 Integrate ZenTao with SVN
- 8.2.7 Integrate ZenTao with Git
- 9 Custom Development
- 9.1 ZenTao Mechanism of Developing
- 9.2 ZenTao Directory
- 9.3 Modify files
- 9.4 ZenTao Database
- 9.5 Common Modules
- 9.6 Add features to navigation bar
- 9.7 Examples: Modify Language Prompt
- 9.8 Examples: set priority when creating bugs
- 9.9 Web Editor
- 9.10 Packaging Standards of ZenTao 1.1
- 10 Other Relevant Issues
- 10.1 About third-party code
- 10.2 ZenTao FAQ
- 10.3 How to Help ZenTao
- 10.4 ZenTao Business Service
- 10.5 Acknowledgement
Integrate ZenTao with Git
- 2015-09-14 11:29:35
- azalea
- 12773
- Last edited by xiying guan on 2018-12-06 10:10:29
1. Git integration mechanism
The basic mechanism of Git integration is to analyze comments of code submission =>get related stories, tasks and bugIDs => write it to the database of ZenTao.
There are two ways todo what have been mentioned above. One is the hook built in Git. When the code is submitted, the hook scripts will be triggered. Then it will analyze comments and obtain bugs, stories or task IDs. Then write revelant records into the database by calling API in ZenTao. The other way is log commands on Git. With the commands, you can get all the submitted records and then generate IDs through analysis. Finally, write them into the database.
2. Deploy git command-line client on the machine installed with ZenTao
GIT command-line client refers to Git commands built in Git. It is git.exe in Windows and git in Linux.The machine installed ZenTao can be separated from that of subversion. They don’t have to be installed in the same machine.
You have to install Git for machines of linux system; Git for rhel and centos with yum and apt-get install for Debian.
3. Configure Git in ZenTao
3.1 Codes
The Configuration file of Git is saved in zentao/module/git/config.php. You can modify this file and it is recommended that the modified version be saved in git/ext/config/git.php. In this way, future update will not override the configuration file.
3.2 Configuration
As for setting subversion parameters, there are concepts involed as follows.- Position of the Git client command
- Repo: multiple repos can be set.
Now let’s see specific examples
3.2.1 Find the location in a red box in the image below.
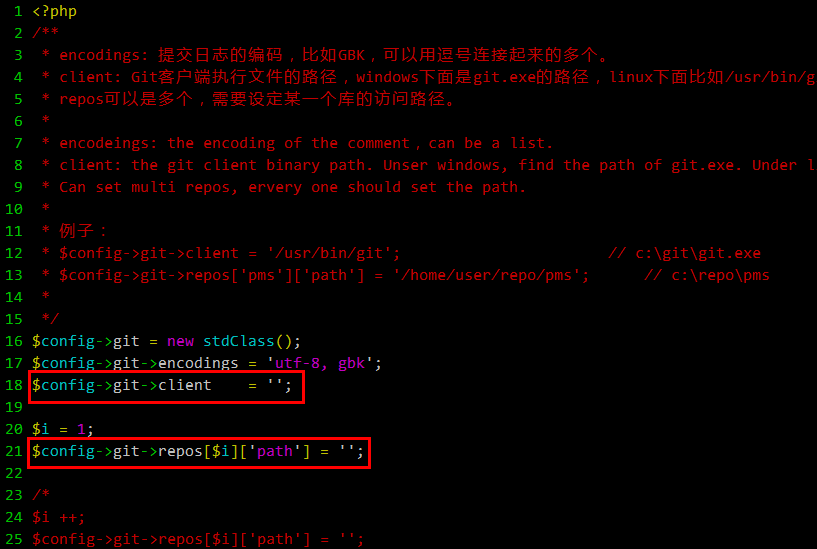
3.2.2 Modify code
Write codes as the examples show:

$config->git->client // the path to fill in git client
$config->git->repos[$i]['path'] // the path to fill in git repo
3.3 Set multiple repos
3.3.1 As in the case above, you can find the following codes in the same file.
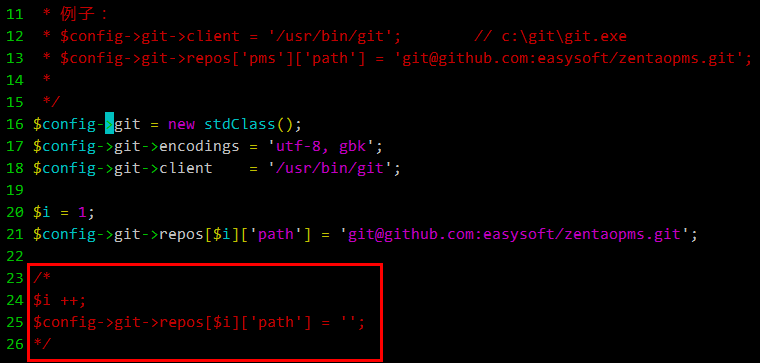
3.3.2 Modify Code
- Delete “/*”and”*/“from the code and other modifications are as shown above. Notes: $i ++ cannot be modified.
- For any git repos, copy the code and configure in the same way.
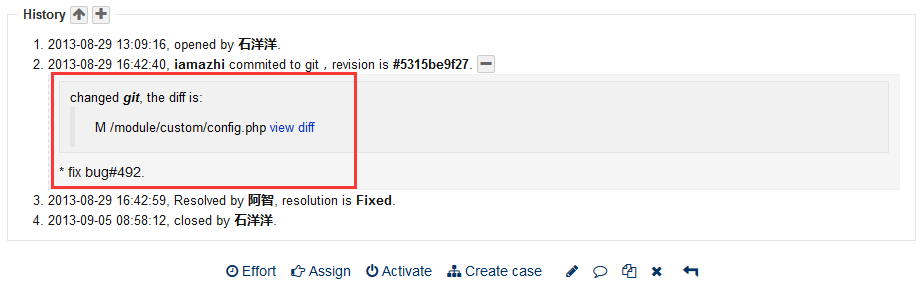
4. Comment format of submitting code
When developers submit to Git, they need to specify modification relevant stories, tasks or bug IDs in the notes in the following format.bug#123,234, 1234 or bug: 123,234 1234; comma or space can be used as pace holders in ID lists;
story#123; task#123.
Bugs, stories and tasks must be labeled.
5. Execute Git synchronizing command
5.1 Refer to Chapter
8.1.1 Intialize Scripts to initialize all the scripts of the command line.5.2 Enter the directory of zentao/bin/ and execute syncgit.bat or syncgit.sh.
5.3 The screenshot of executing the scripts.
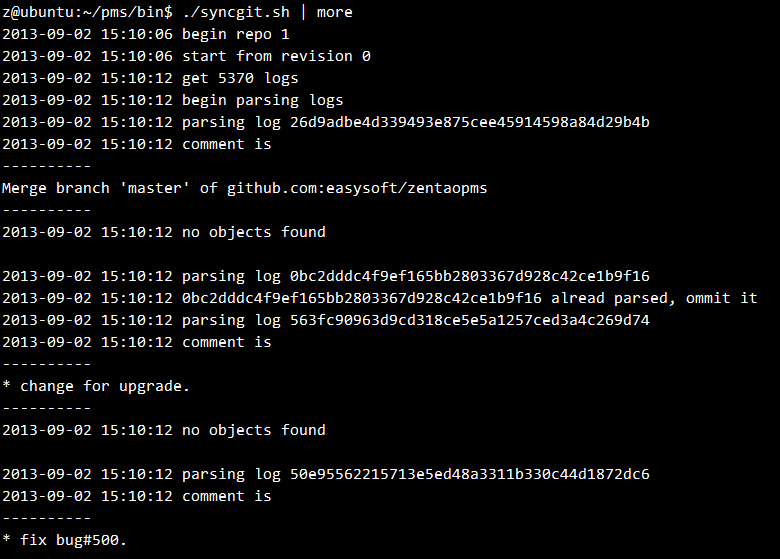
5.4 Check bugs.
6. Deploy scheduled tasks
6.1 When all the commands are deployed, add the commands to the scheduled tasks. For example, execute the task every 5 minutes. Use scheduled tasks in Windows and crontab in Linux.6.2 The code repository configured has to be synchronized with the scheduled tasks and use Git pull every 5 minutes.