- 1 Introduction
- 1.1 About ZenTao
- 1.2 How to get support
- 2 How to Install ZenTao
- 2.1 Choose the best installation
- 2.2 ZenTao Cloud
- 2.3 One-click Installation Package for Windows (Recommended)
- 2.4 One-click Installation Package for Linux
- 2.5 Source Code Installation Package (for all Systems)
- 2.6 Set up Virtualbox for ZenTao
- 2.7 Softaculous service
- 3 Upgrade ZenTao
- 3.1 Choose Upgrade
- 3.2 Upgrade by source codes (General for all systems)
- 3.3 Upgrade for one-click installation package for windows users (xampp)
- 3.4 Upgrade for one-click installation package for Linux
- 4 Users and Groups
- 5 Simple Application
- 6 Basic Application
- 6.1 Basic Workflow
- 6.2 Agile and Scrum
- 6.3 ZenTao and Scrum
- 6.4 ZenTao Tutorial for Rookies
- 6.5 Create a Product
- 6.6 Create a Story
- 6.7 Create a Project
- 6.8 Confirm Stories
- 6.9 Decompose Tasks
- 6.10 Report a Bug
- 6.11 Manage Contacts
- 6.12 Customization
- 7 Advanced Application
- 7.1 Workflow
- 7.1.1 ZenTao Workflow
- 7.2 Personal management
- 7.2.1 My To-dos
- 7.2.2 My Task, Story and Bug
- 7.2.3 My Profile
- 7.3 Product Manager
- 7.3.1 Manage a Product
- 7.3.2 Create and Review a Story
- 7.3.3 Change and Review a Story
- 7.3.4 Story Status
- 7.3.5 Notes for Writing a Story
- 7.3.6 Product Module
- 7.3.7 Release Plan
- 7.3.8 Create a Release
- 7.3.9 Roadmap
- 7.3.10 Manage Documents
- 7.3.11 Product Meetings
- 7.3.12 Project Management, Presentation and Summary
- 7.3.13 Story Reports
- 7.4 Project Manager
- 7.5 Development Team
- 7.5.1 Project planning meeting and decompose tasks
- 7.5.2 Claim and update Tasks
- 7.5.3 Create a Build
- 7.5.4 Test Task
- 7.5.5 Resolve a Bug
- 7.5.6 Manage Documents
- 7.5.7 Confirm Bugs
- 7.6 Testing Team
- 7.6.1 Bug Management
- 7.6.2 Submit a Bug
- 7.6.3 Confim and Close a Bug
- 7.6.4 Activate a Bug
- 7.6.5 Find a Bug
- 7.6.6 Test Case
- 7.6.7 Create a Test Case
- 7.6.8 Manage a Test Task
- 7.6.9 Execute Cases and Report Bugs
- 7.6.10 Reports
- 8 Configuration
- 8.1 Maintain ZenTao
- 8.1.1 Initialize scripts
- 8.1.2 Back up ZenTao
- 8.1.3 Recover the deleted
- 8.1.4 Update Burndown charts
- 8.2 Deploy ZenTao
- 8.2.1 Guest Login
- 8.2.2 Cnfigure Email
- 8.2.3 Set Super Admin
- 8.2.4 Configure Static Access
- 8.2.5 Delete "zentao" from your address
- 8.2.6 Integrate ZenTao with SVN
- 8.2.7 Integrate ZenTao with Git
- 9 Custom Development
- 9.1 ZenTao Mechanism of Developing
- 9.2 ZenTao Directory
- 9.3 Modify files
- 9.4 ZenTao Database
- 9.5 Common Modules
- 9.6 Add features to navigation bar
- 9.7 Examples: Modify Language Prompt
- 9.8 Examples: set priority when creating bugs
- 9.9 Web Editor
- 9.10 Packaging Standards of ZenTao 1.1
- 10 Other Relevant Issues
- 10.1 About third-party code
- 10.2 ZenTao FAQ
- 10.3 How to Help ZenTao
- 10.4 ZenTao Business Service
- 10.5 Acknowledgement
Change and Review a Story
- 2015-09-11 10:10:22
- azalea
- 12726
- Last edited by xiying guan on 2018-12-06 10:09:40
Change management is an essential process in story management. Story change is not complicated, but it can be complicated if the scope a change can impact is not clear. In traditional project management, project manager cannot define the impact due to the lack of software support. In ZenTao, stories, tasks, bugs and cases are integrated, the impact can be defined.
The workflow of story change is shown as below,
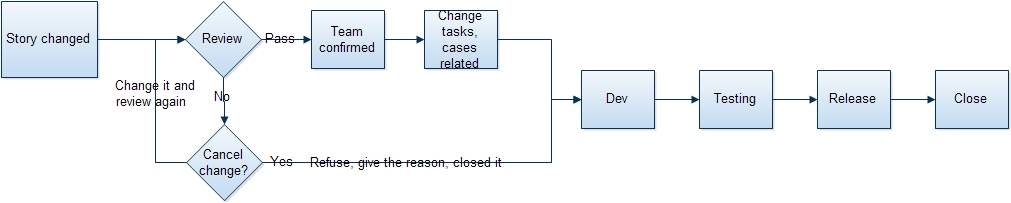
1. Story Change
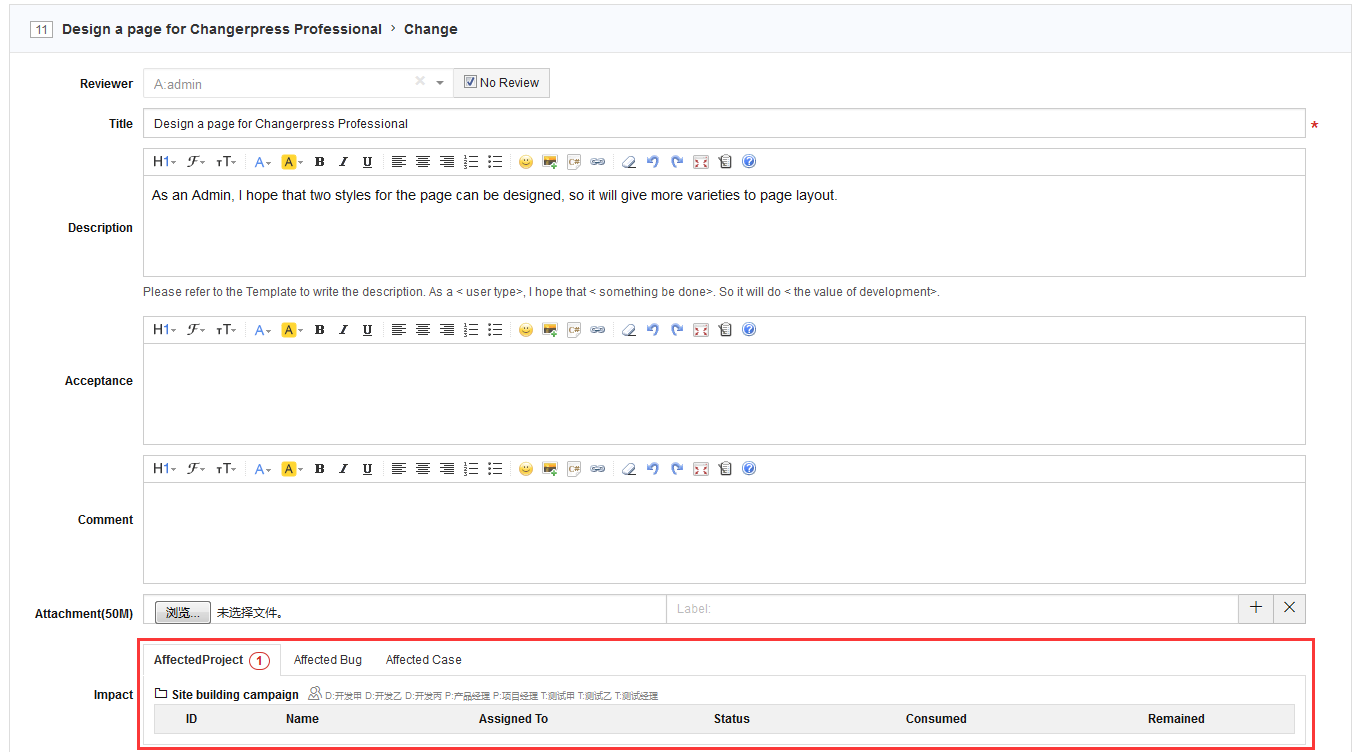
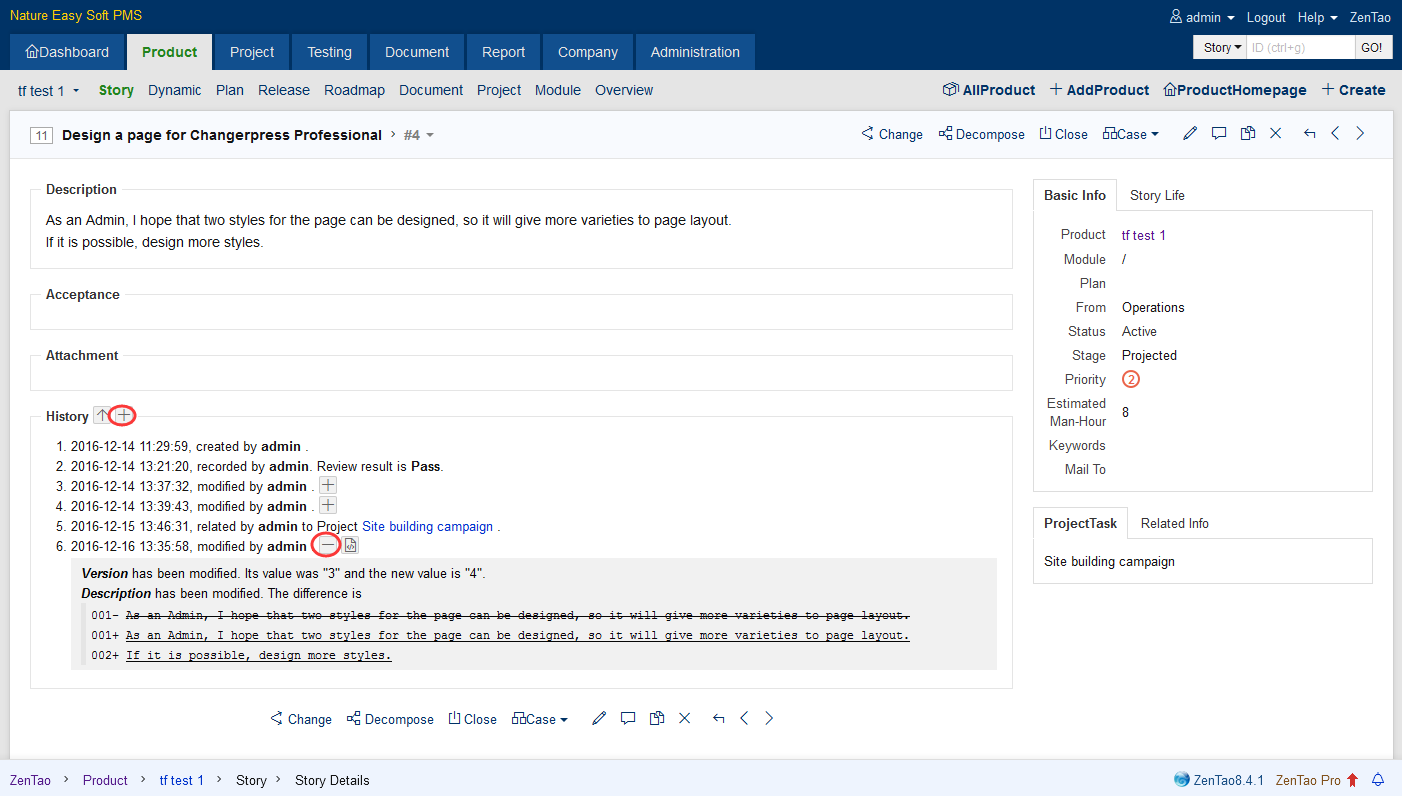
ZenTao provides a professional workflow of story change. Any modifications to the title, description, Acceptance standards and attachments of a story must go by the workflow.
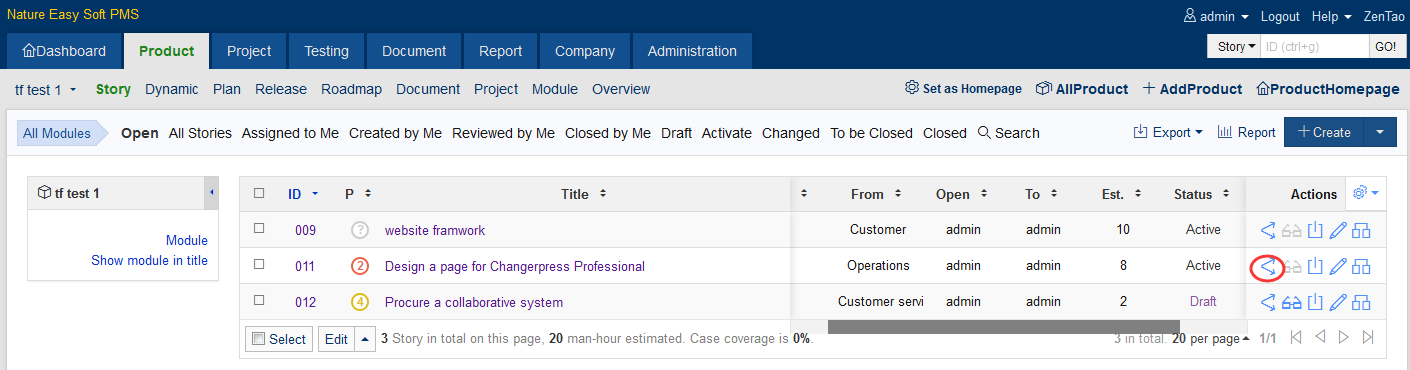
Click the Change button in Actions of the Story your want to change.
- Click Edit button can not go to the page to change the titles, descriptions, verification standards or attachments of a story.
- When changing a story, if No Review is checked, the story will be automatically activated and the review process can be skipped.
- The impact scope will be listed when making changes to a story.
2. Story Review
2.1 View History before and after changes by clicking "+" button.
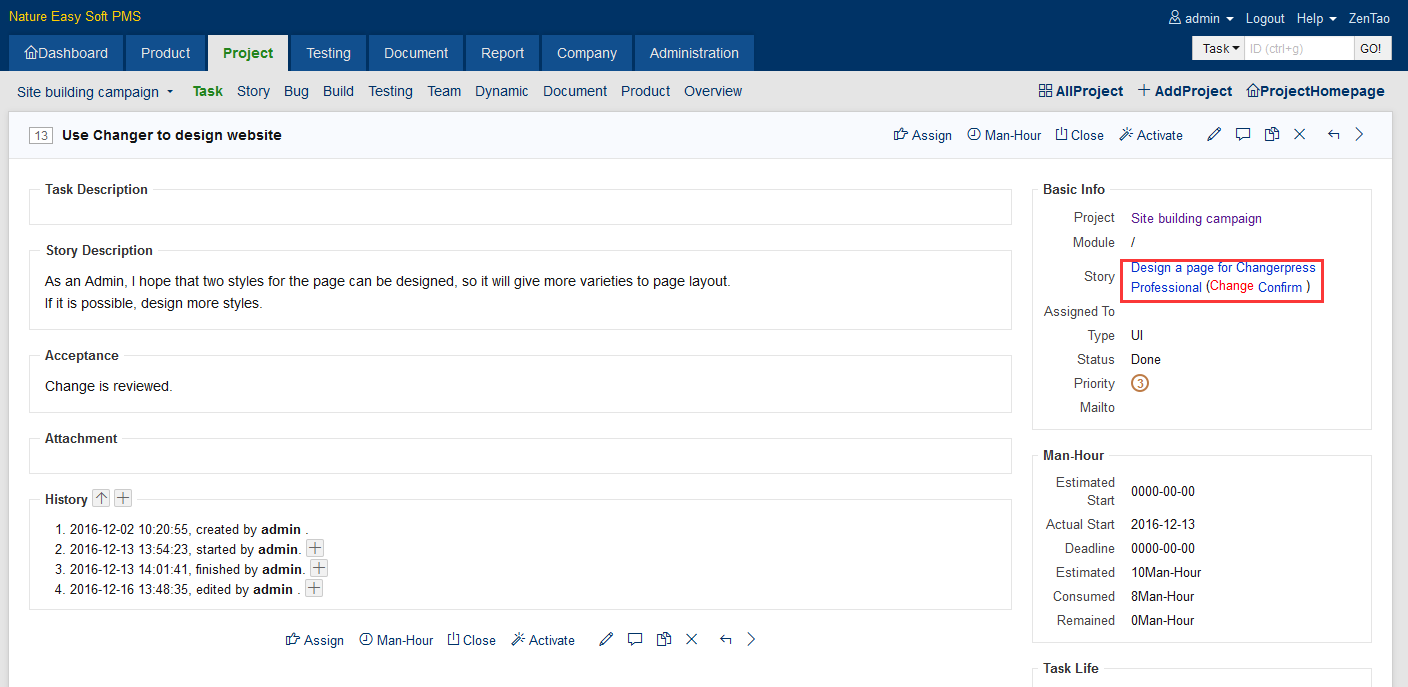
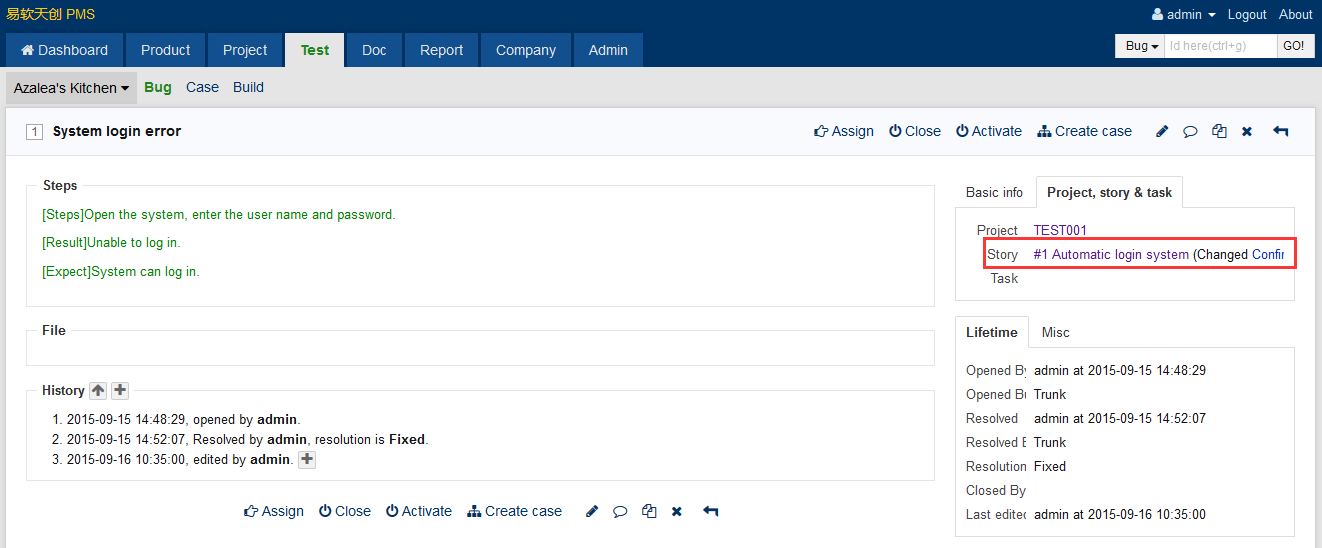
3. Confirm Story Change
When the story change is done, the development teams and testing team should confirm the changes.
3.1 Confirm change on the page of Task.
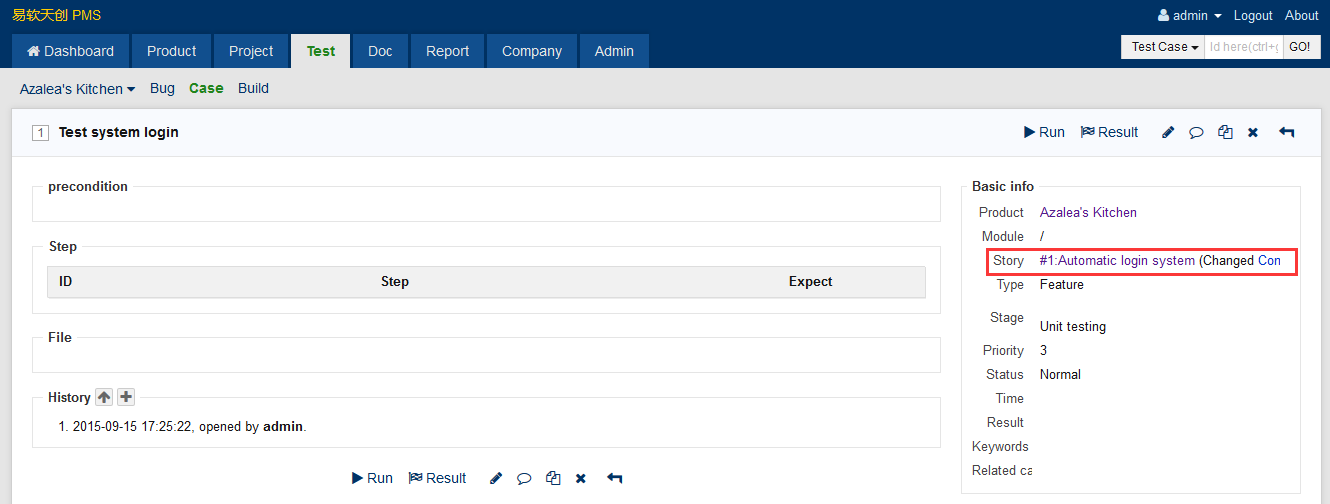
3.2 Confirm change on the page of Bug.
3.3 Confirm change on the page of Case.