- 1 Introduction
- 1.1 About ZenTao
- 1.2 How to get support
- 2 How to Install ZenTao
- 2.1 Choose the best installation
- 2.2 ZenTao Cloud
- 2.3 One-click Installation Package for Windows (Recommended)
- 2.4 One-click Installation Package for Linux
- 2.5 Source Code Installation Package (for all Systems)
- 2.6 Set up Virtualbox for ZenTao
- 2.7 Softaculous service
- 3 Upgrade ZenTao
- 3.1 Choose Upgrade
- 3.2 Upgrade by source codes (General for all systems)
- 3.3 Upgrade for one-click installation package for windows users (xampp)
- 3.4 Upgrade for one-click installation package for Linux
- 4 Users and Groups
- 5 Simple Application
- 6 Basic Application
- 6.1 Basic Workflow
- 6.2 Agile and Scrum
- 6.3 ZenTao and Scrum
- 6.4 ZenTao Tutorial for Rookies
- 6.5 Create a Product
- 6.6 Create a Story
- 6.7 Create a Project
- 6.8 Confirm Stories
- 6.9 Decompose Tasks
- 6.10 Report a Bug
- 6.11 Manage Contacts
- 6.12 Customization
- 7 Advanced Application
- 7.1 Workflow
- 7.1.1 ZenTao Workflow
- 7.2 Personal management
- 7.2.1 My To-dos
- 7.2.2 My Task, Story and Bug
- 7.2.3 My Profile
- 7.3 Product Manager
- 7.3.1 Manage a Product
- 7.3.2 Create and Review a Story
- 7.3.3 Change and Review a Story
- 7.3.4 Story Status
- 7.3.5 Notes for Writing a Story
- 7.3.6 Product Module
- 7.3.7 Release Plan
- 7.3.8 Create a Release
- 7.3.9 Roadmap
- 7.3.10 Manage Documents
- 7.3.11 Product Meetings
- 7.3.12 Project Management, Presentation and Summary
- 7.3.13 Story Reports
- 7.4 Project Manager
- 7.5 Development Team
- 7.5.1 Project planning meeting and decompose tasks
- 7.5.2 Claim and update Tasks
- 7.5.3 Create a Build
- 7.5.4 Test Task
- 7.5.5 Resolve a Bug
- 7.5.6 Manage Documents
- 7.5.7 Confirm Bugs
- 7.6 Testing Team
- 7.6.1 Bug Management
- 7.6.2 Submit a Bug
- 7.6.3 Confim and Close a Bug
- 7.6.4 Activate a Bug
- 7.6.5 Find a Bug
- 7.6.6 Test Case
- 7.6.7 Create a Test Case
- 7.6.8 Manage a Test Task
- 7.6.9 Execute Cases and Report Bugs
- 7.6.10 Reports
- 8 Configuration
- 8.1 Maintain ZenTao
- 8.1.1 Initialize scripts
- 8.1.2 Back up ZenTao
- 8.1.3 Recover the deleted
- 8.1.4 Update Burndown charts
- 8.2 Deploy ZenTao
- 8.2.1 Guest Login
- 8.2.2 Cnfigure Email
- 8.2.3 Set Super Admin
- 8.2.4 Configure Static Access
- 8.2.5 Delete "zentao" from your address
- 8.2.6 Integrate ZenTao with SVN
- 8.2.7 Integrate ZenTao with Git
- 9 Custom Development
- 9.1 ZenTao Mechanism of Developing
- 9.2 ZenTao Directory
- 9.3 Modify files
- 9.4 ZenTao Database
- 9.5 Common Modules
- 9.6 Add features to navigation bar
- 9.7 Examples: Modify Language Prompt
- 9.8 Examples: set priority when creating bugs
- 9.9 Web Editor
- 9.10 Packaging Standards of ZenTao 1.1
- 10 Other Relevant Issues
- 10.1 About third-party code
- 10.2 ZenTao FAQ
- 10.3 How to Help ZenTao
- 10.4 ZenTao Business Service
- 10.5 Acknowledgement
Create and Review a Story
- 2015-09-11 10:10:22
- azalea
- 11939
- Last edited by xiying guan on 2018-12-06 10:09:40
Product managers are used to write stories and specifications. Stories about a product usually are defined in a Word file. But in ZenTao it is suggested that stories be written by features, which is to summarize each feature in the Word file and transcribed to ZenTao as separate story. According to Scrum, it can be called user story. An user story is to describe user types, user objectives or values of their objectives. With all the information, it’s very convenient to communicate and cooperate with team members.
1. Create a Story
- Log in as a product manager;
- Go the Product-> Story.

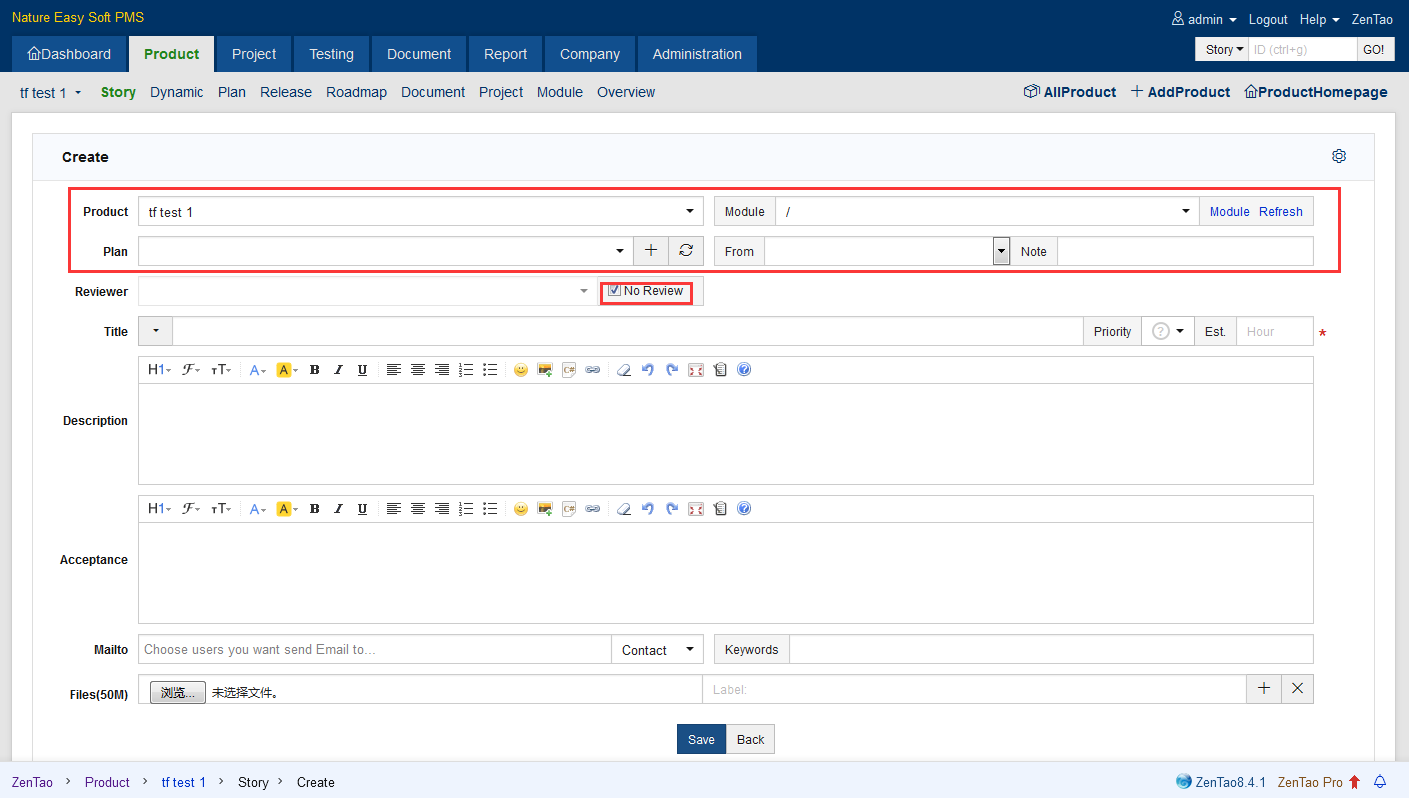
- Click the menu “Create” at the right, and the page of Add a Story will pop out.

- The title of the Story is required.
- It can be left empty temporarily, such as the plan and module the Story belong to.
- Check "No Review" in Reviewed By, so the Story that is about to be added is activc. Only activc Story can be linked to the projects and then to be developed.
- Mailto can be set, so relevant members can be notified about all changes in the Storyby emails.
- Keywords can help you search. You can set keywords, so content can be searched by keywords.
2. Review a Story
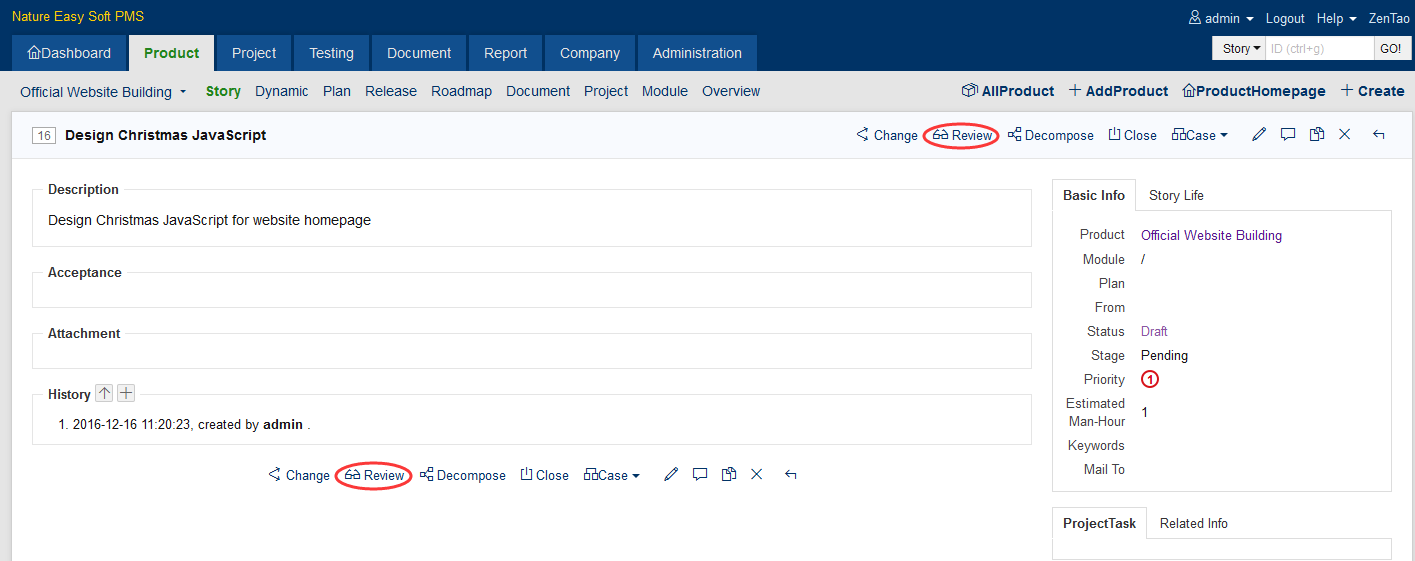
When creating a story, there is a check box "No Review". If checked, the status of the Story is Activc. But in most cases, the story still needs to be reviewed. Even if there is a designated person who is in charge of the product, your can also save your ideas as a drafts for further consideration. The review process of newly added story is shown as follows.

Now let’s look at the Review page of a Story. Choose the Story that needs to be reviewed, and click the Review button.

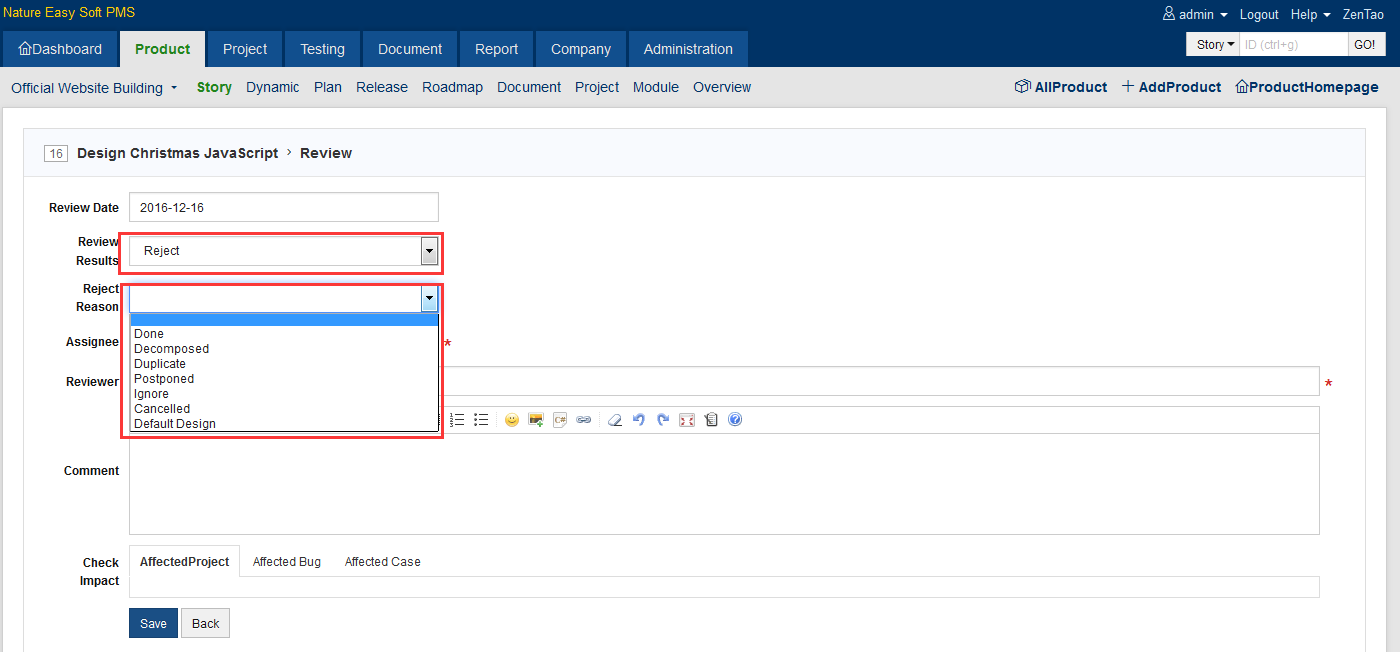
The Review Result includes Pass, Clarify, and Reject. If passed, the status of the story will be changed to Activc and then it can be linked to the project for development.

- If Clarify, the story will be kept as a draft and reassigned to the one who created it for improvements.
- If rejected, rejection reasons will be provided. The reasons include,
- Reviewed By is the user involved in the review and can be automatically screened by user names. Generally speaking, story review can be an off-line meeting, and people involved in the review should be recorded in ZenTao.
