
- 1 Introduction
- 1.1 About ZenTao
- 1.2 How to get support
- 2 How to Install ZenTao
- 2.1 Choose the best installation
- 2.2 ZenTao Cloud
- 2.3 One-click Installation Package for Windows (Recommended)
- 2.4 One-click Installation Package for Linux
- 2.5 Source Code Installation Package (for all Systems)
- 2.6 Set up Virtualbox for ZenTao
- 2.7 Softaculous service
- 3 Upgrade ZenTao
- 3.1 Choose Upgrade
- 3.2 Upgrade by source codes (General for all systems)
- 3.3 Upgrade for one-click installation package for windows users (xampp)
- 3.4 Upgrade for one-click installation package for Linux
- 4 Users and Groups
- 5 Simple Application
- 6 Basic Application
- 6.1 Basic Workflow
- 6.2 Agile and Scrum
- 6.3 ZenTao and Scrum
- 6.4 ZenTao Tutorial for Rookies
- 6.5 Create a Product
- 6.6 Create a Story
- 6.7 Create a Project
- 6.8 Confirm Stories
- 6.9 Decompose Tasks
- 6.10 Report a Bug
- 6.11 Manage Contacts
- 6.12 Customization
- 7 Advanced Application
- 7.1 Workflow
- 7.1.1 ZenTao Workflow
- 7.2 Personal management
- 7.2.1 My To-dos
- 7.2.2 My Task, Story and Bug
- 7.2.3 My Profile
- 7.3 Product Manager
- 7.3.1 Manage a Product
- 7.3.2 Create and Review a Story
- 7.3.3 Change and Review a Story
- 7.3.4 Story Status
- 7.3.5 Notes for Writing a Story
- 7.3.6 Product Module
- 7.3.7 Release Plan
- 7.3.8 Create a Release
- 7.3.9 Roadmap
- 7.3.10 Manage Documents
- 7.3.11 Product Meetings
- 7.3.12 Project Management, Presentation and Summary
- 7.3.13 Story Reports
- 7.4 Project Manager
- 7.5 Development Team
- 7.5.1 Project planning meeting and decompose tasks
- 7.5.2 Claim and update Tasks
- 7.5.3 Create a Build
- 7.5.4 Test Task
- 7.5.5 Resolve a Bug
- 7.5.6 Manage Documents
- 7.5.7 Confirm Bugs
- 7.6 Testing Team
- 7.6.1 Bug Management
- 7.6.2 Submit a Bug
- 7.6.3 Confim and Close a Bug
- 7.6.4 Activate a Bug
- 7.6.5 Find a Bug
- 7.6.6 Test Case
- 7.6.7 Create a Test Case
- 7.6.8 Manage a Test Task
- 7.6.9 Execute Cases and Report Bugs
- 7.6.10 Reports
- 8 Configuration
- 8.1 Maintain ZenTao
- 8.1.1 Initialize scripts
- 8.1.2 Back up ZenTao
- 8.1.3 Recover the deleted
- 8.1.4 Update Burndown charts
- 8.2 Deploy ZenTao
- 8.2.1 Guest Login
- 8.2.2 Cnfigure Email
- 8.2.3 Set Super Admin
- 8.2.4 Configure Static Access
- 8.2.5 Delete "zentao" from your address
- 8.2.6 Integrate ZenTao with SVN
- 8.2.7 Integrate ZenTao with Git
- 9 Custom Development
- 9.1 ZenTao Mechanism of Developing
- 9.2 ZenTao Directory
- 9.3 Modify files
- 9.4 ZenTao Database
- 9.5 Common Modules
- 9.6 Add features to navigation bar
- 9.7 Examples: Modify Language Prompt
- 9.8 Examples: set priority when creating bugs
- 9.9 Web Editor
- 9.10 Packaging Standards of ZenTao 1.1
- 10 Other Relevant Issues
- 10.1 About third-party code
- 10.2 ZenTao FAQ
- 10.3 How to Help ZenTao
- 10.4 ZenTao Business Service
- 10.5 Acknowledgement
Basic Workflow
- 2015-09-10 16:21:23
- azalea
- 13338
- Last edited by xiying guan on 2018-12-06 10:09:00
In the previous chapter, we have talked about the simple workflow of ZenTao. You can cutomize your process according to your actual situations. However, we still want you to make full use of all features of ZenTao. Therefore, let's look at the basic workflow of ZenTao.
In ZenTao, there are three key roles, product managers, Development teams and test teams. The three roles cooperate with each other through stories, repreansenting the separation of the three powers in project management. Product managers gather stories; Development teams perform tasks, and test teams ensure qualities. Their relations are shown as below,
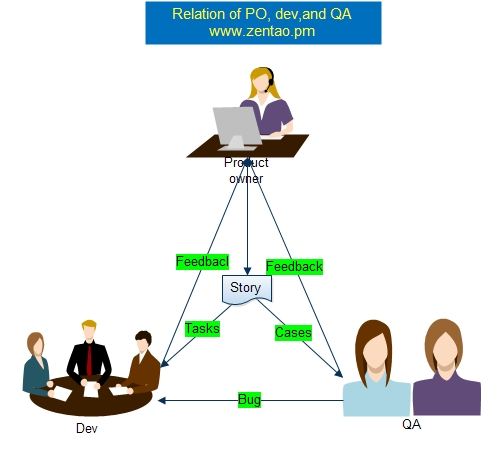
The basic workflow of ZenTao,
1. Product managers create products;2. Product managers create stories;
3. Project managers create projects;
4. Project managers identify the stories of projects;
5. Project managers decompose tasks and assign tasks to specific team members;
6. Test teams test cases and report bugs.